Categories
Bottom Brackets and Crank Sets Drivetrain Touring Bicycles

Bottom Brackets

At the risk of talking down to some readers and over the head of others I feel the need to explain the term “bottom bracket”. According to Sheldon Brown’s Bicycle Glossary a bottom bracket is:
The part of the frame around which the pedal cranks revolve, also the bearings and axle assembly that runs through the bottom bracket shell of the frame.
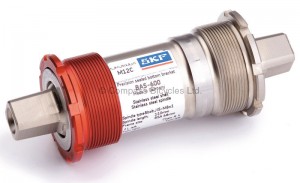
SKF Bottom Bracket
This is an SKF brand bottom bracket. The red cup slips off to allow the unit to be threaded into the bottom bracket shell.

Looking at the late Mr. Brown’s page I realized I am opening a bona fide can of worms. There are several bottom bracket “standards”, and bottom bracket/crankset interfaces. We won’t even get into “outboard bearing” and “BB30” and other new standards which are mostly calculated to keep the buying public buying, while claiming to add some performance advantage…not performance related to the durability or function of the piece… but of the rider/bike.

“Square taper” bottom brackets are made to work with “square taper” cranksets and cranksets with suitable chain ring sizes for touring generally are of the square taper variety. Clink this link for a discussion of gears and gearing. So this series of pieces will be about square taper bottom brackets.There are still compatibility issues to think about though. The taper on Italian (Campagnolo) cranks and bottom brackets are different from the taper on cranks and bottom brackets made anyplace else in the known Universe, which actually is typical of Campy parts. And bottom brackets come with different spindle lengths. The correct spindle length for a given bicycle will be a function of the width of the bottom bracket shell, the shape of the chain stays and of the shape of the crank. For example: with a Sugino XD500 (XD2) triple crank set on a Surly Long Haul Trucker, a 107mm to 110mm spindle length works well.

Before the widespread use of cartridge bearings, bottom brackets were designed with loose balls or caged balls running on races inside the cups and races shaped into the spindle. Mechanical seals or o-rings were used to keep out water and dirt. Nowadays the spindle is held inside a case by means of sealed cartridge bearings pressed onto the spindle. The only seals being those on the bearings themselves. A less than ideal state of affairs for the part of the bicycle in a location that will be sprayed from time to time with a slurry of water, grease, oil, de-icer, sand and grit.

So, what’s the dyed-in-the-wool bike tourist to do? In the following posts we will explore some of the available options for touring bike bottom brackets. If the idea of reading about that titillates you, you should think about getting a life.

Categories
Surly Bikes Touring Bicycles

Surly Disc Trucker

Nate was here to pick out a Long Haul Trucker this weekend. He rides a mountain bike with hydraulic disc brakes, and so he was a little bit unsure about what type of brakes would work best on a touring bike. According to what he had heard and his experiences, disc brakes:
-are finicky and difficult to adjust
-are prone to failure
-have better stopping power and control than rim brakes
-interfere with the installation of fenders and/or racks
I imagine the same questions might come up when other people are considering the new Disc Trucker vs. the standard rim brake equipped Long Haul Trucker. (An earlier post discussed some different types of rim brake calipers.)

As a primer, there are two types of disc brakes: Hydraulic brakes and mechanical or “cable actuated” brakes. Actually there are 4 types: crummy hydraulic disc brakes, good hydraulic disc brakes, crummy mechanical disc brakes and good mechanical disc brakes. Good hydraulic disc brakes are not difficult to adjust, have incredible stopping power and are very smooth with great “modulation” or control. The downside is that if something does go wrong with the closed hydraulic system, the brakes will need a sometimes costly and time consuming repair. Good hydraulic dis brakes are also not inexpensive. Crummy hydraulic disc brakes may work ok for awhile but when there is a problem it might be better to replace them.

hydraulic disc brake lever
Hydraulic disc brakes have a fluid reservoir, typically integrated with the lever.


hydraulic brake caliper
Disc brakes require mounts on the frame and fork and the wheels need to have hubs made to mount disc rotors.

Mechanical disc brakes are more user friendly. Partly because they are actuated by a cable, just like sidepull or cantilever brakes, and partly because the individual pistons, and hence the individual brake pads, are adjustable. On a crummy mechanical disc brake only one piston can be adjusted. But on a decent mechanical disc brake such as the Avid BB7 which comes stock on the Disc Trucker, both pistons/pads are adjustable making setup and maintenance adjustments relatively easy.

I don’t consider availability of replacement parts to be a factor when comparing the suitability of mechanical disc brakes vs. rim brakes for a touring bike. Spare cables are cheap and small (and the same cable works in either type of brake) as are pads. In fact, replacing pads and adjusting them with BB7 brakes may be easier than replacing and adjusting cantilever or v-brake pads. In some cases the disc rotor may need to be replaced but these too are light and cheap and don’t take up much room in the bike panniers.

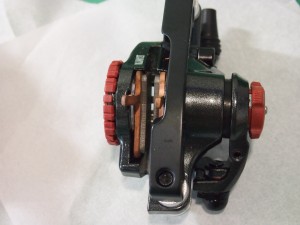
Avid BB7 brake caliper
A cable actuated or mechanical disc brake caliper. The red knobs adjust the pad postion.


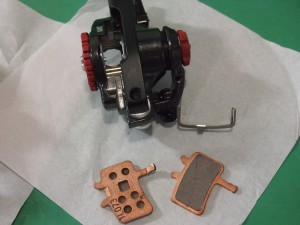
Avid BB7 brake caliper
The pads and retention spring pop out for replacement (a needle nose pliers comes in handy)


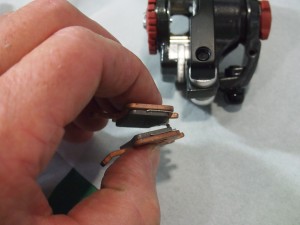
Avid BB7 brake caliper
Sandwich the spring between the two pads and pop the assembly back in- easy cheesy


Avid BB7 brake caliper
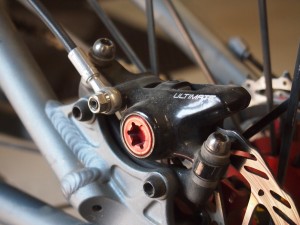
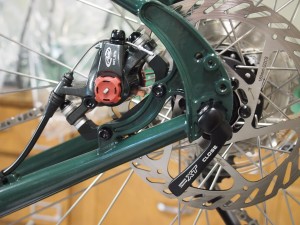
Surly designed a special dropout for the Disc Trucker. The caliper nestles between the stays and is out of harm’s way and out of the way of rack and fender struts.


Avid BB7 brake caliper
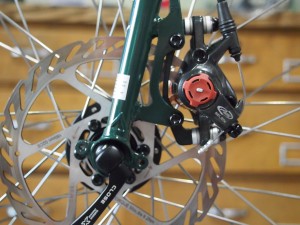
The front caliper on a Surly Disc Trucker requires a little bit of ingenuity when installing fenders. The good news is that fender stays bend quite easily!

More about disc brakes:
If a wheel spoke snaps, rim brakes will likely rub on the now out of true rim, whereas a disc brake will still work. Disc brakes may also maintain their stopping power better in wet conditions, but once the rotors and pads are contaminated with dirt and grease they may squeal. I appreciate the arguably cleaner look the bike has with disc brakes.

So, after all, Nate decided to get the Disc Trucker and is happy with the added stopping power. For those considering a Disc Trucker over a rim brake Long Haul Trucker, maintenance and service concerns should be low on the list.

Categories
Front Racks Touring Bike Accessories

Salsa and Axiom Low Rider Racks

So called “low rider” racks are popular for carrying panniers on the front of the bike. We have already gone over the Nitto Campee rack and the Nitto M-12-2 rack.
Axiom makes the Journey DLX Lowrider and Salsa sells the Down Under rack. Both are made of tubular aluminum.

The Salsa rack is similar to the Tubus Duo in that the top rails sandwich the fork blade and bolt on both sides of it. The only down side is that not all fork blades have a threaded boss on both sides. (The Surly Long Haul Trucker does)

The Down Under rack attaches to the fork dropout eyelets with a welded tab. There are no moving parts and the rack is all one piece which should make it fairly reliable. My only gripe is that there are no “pannier stops” on the top rail and so the panniers have a tendency to slide back and forth but I think some simple after market mods would solve that.

There is a barrel boss welded to the leading edge of both top rails though, ostensibly for the attachment of Salsa’s Minimalist front top rack, but I think they would make ideal light mounts.

The Salsa Down Under low rider rack
Long top rails with a forward bias and barrel bosses for a Salsa Minimalist rack or for lights

The Axiom Journey DLX Lowrider rack employs a two piece design and comes with a large u-bolt to attach to the fork leg. The two pieces are designed to pivot in order to achieve a fairly level attachment rail for the panniers when used on forks with varying rakes. The good thing about this rack is that mid fork eyelets are not required, in fact it appears that the u-bolt attachment actually is designed to stabilize the rack from twisting. When I bolted the rack to one mid fork eyelet on the Long Haul Trucker I was able to twist the rack with my hands- less than ideal for carrying bags next to the wheels! And even with the pivoting design I was unable to get the top rails completely level with the floor when mounted. On a bike with 26″ wheels and wide profile cantilever brakes, such as the Tektro CR-720, the top rail interferes with the brake caliper….not an issue obviously on a 700c wheel bike or even a 26″ one with disc brakes or narrow profile cantilevers.
Another good feature is the stops on top of the rails to keep the panniers from sliding. This is a serviceable entry level touring rack that will not break the bank.

The Axiom Journey DLX Lowrider. A decent entry level low rider rack.


Tabs on the top to keep the panniers from sliding. The wide profile brakes on this 26" wheel bike hit the top rail of the rack.