The wintertime (known to some among us as the “off-season”) is a great time to experiment with your bike setup and few components can transform the ride of a bike like handlebars. Unlike many so-called “performance” upgrades that claim to offer weight savings, greater precision or improved efficiency, different handlebars change the way your body relates to the bicycle in a fundamental and important way. The wrong handlebar can make the finest bicycle nearly unrideable. The right handlebar can enhance comfort, control and confidence. The Jones Loop H-Bar does just that. As many of the Surly bikes we sell (in addition to many other touring bikes) come with drop bars and bar-end shifters, I thought I’d share my experience converting my personal bike from drop bars to H-Bars. I’ll get more into the details and technicalities of the process – especially the fit aspect – in a future post, so stay tuned for that.
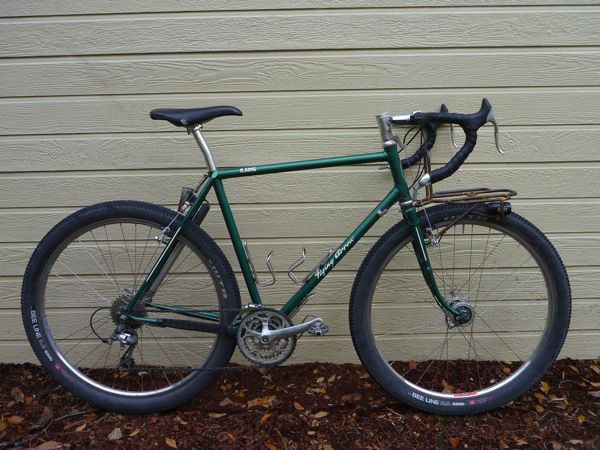
I built my dirt touring bike – the RandoGnar – around drop bars. I had the wide-open and reasonably smooth gravel roads of north-central Oregon in mind when drawing up the plans and laying out the cockpit. The position is very similar to what I’ve used on my cyclocross bike to provide a good balance of comfort, aerodynamics and pedaling efficiency for long, mixed-terrain rides and ‘cross racing. This setup performed admirably on the Oregon Outback in May, 2014 and I wouldn’t have changed a thing. However, on rough descents or technical singletracks, the hand and body positions offered by drop bars leave something to be desired. When riding in the drops – the preferred position for descending – my weight is shifted far forward over the front wheel which tends to generate a feeling of “oh-crap-I’m-about-to-get-pitched-over-the-bars”. This leads to tension throughout the my body, causing fatigue and a diminished ability to ride lightly over rough surfaces.

Upon moving to Idaho and sampling some of the unpaved roads and singletracks in the central part of the state, I found myself wishing for a different handlebar. Descending on a loaded bike through rough, rocky, loose terrain can be sketchy on any bike but I’ve had some harrowing moments on rutted, washed out mountain roads and trails down in the hooks of my deep drops.
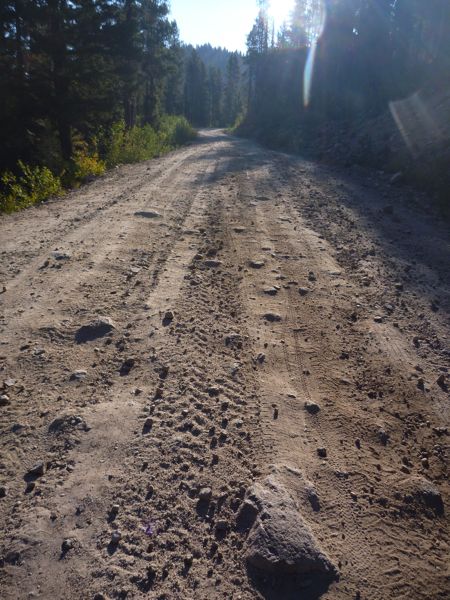
Anyone who has ridden a modern mountain bike can tell you that a short stem and wide, flat handlebars yield enhanced control in challenging terrain. It is easy to keep the front wheel light and approach steep terrain with confidence. So for mixed-terrain bikepacking and touring – where we ride long hours on loaded bikes in widely varying conditions – we need a middle ground. We like the range of hand and body positions offered by drop bars but miss the confidence and control lent by a flat bar with things get rough. The Loop H-Bar treads this fine line better than perhaps any other handlebar available.
Your list of necessary parts will vary, but here are the parts I needed to effect the conversion.
– Thomson X.4 Stem, 90mm x 0-deg
– Paul Thumbies for Shimano shifters, 22.2 clamp
– Shimano BL-R550 canti levers
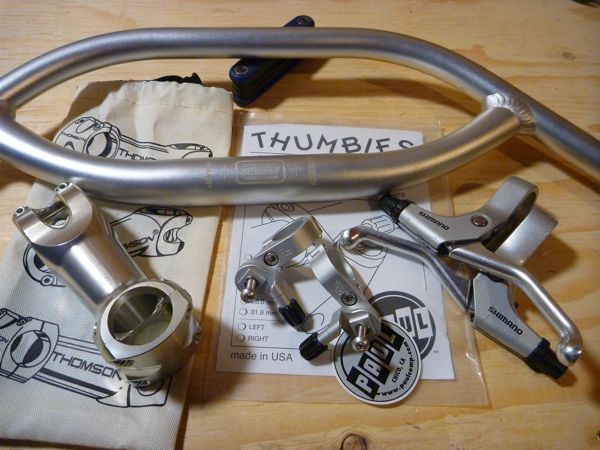
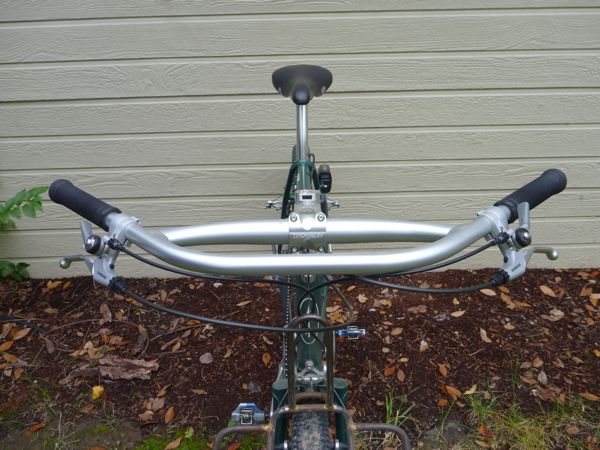
I replaced my 100mm, -10 degree stem with a 90mm, 0 degree version to bring the handlebar clamp up closer to level with the saddle height for a nice, balanced riding position. I am now able to rotate my hips back slightly and rest my weight lightly on the saddle with most of my body supported by the pedals. The stance is upright and controlled but with enough forward reach possible to tuck under the wind. On the road, the forward extension offers a very similar perch to riding on the “ramps” of my drop bars. On singletrack, the extra width and rearward extension provides a very strong and confident stance to attack steep terrain with one finger tucked in the crook of the brake levers. The overall look is a little cruiser-y but the bike feels much more at home in singletrack.
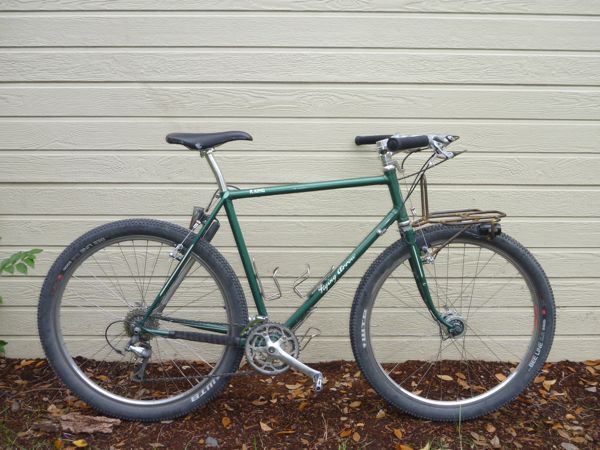
These bars are now the widest I have on any bike. The extra leverage and control is remarkable.
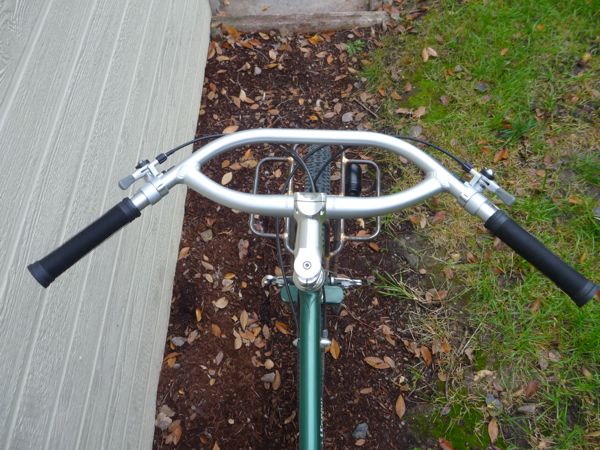
ODI’s classic Longneck BMX grips pair well with the Jones bars. The extra length covers more of the handlebar section than a standard mountain bike grip. I prefer to trim the flanges off for additional shifter clearance. We also offer the ESI foam grips which are designed for the long grip section of the H-Bars.
Also, I found (in corroboration with Jeff Jones’ guidelines) that the ergonomics of this setup are much improved by adjusting the brake levers’ reach screws in slightly to bring the lever blades closer to the bars. Those with extra-long fingers may not need to make the adjustment but the levers are easy to reach with the first finger even when at the farthest rearward position on the bars. The BL-R550 levers deliver a very strong pull to my cantilever brakes and a comfortable lever shape for one or two fingers.
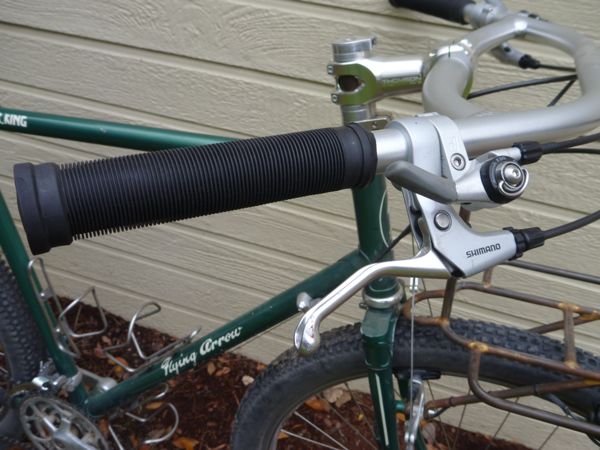
The sweep and width of these bars has transformed the Rando-Gnar from a dirt road crusher into a singletrack slayer. I’m able to ride much faster and more confidently than I ever thought possible on a rigid bike. In addition to the range of hand positions, the 45-degree sweep of the bars offers excellent leverage for lifting either end of the bike over obstacles in the trail. This is especially helpful when the bike is loaded and requires more effort to maneuver.
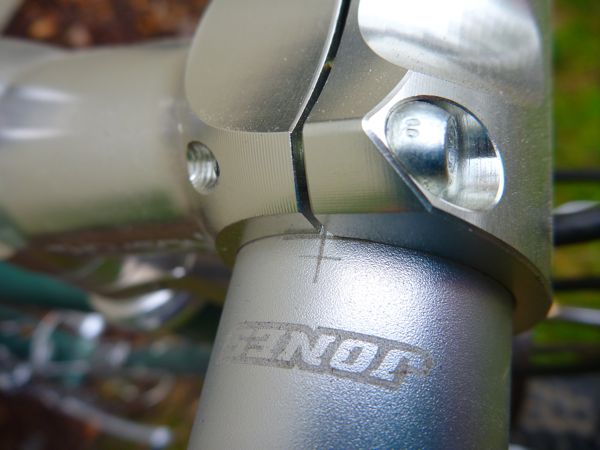
Thomson’s X4 stem pairs perfectly with the Jones bars. Even the alignment marks align with the edges of the clamp jaws.
On the first few shakedown rides in the Boise foothills, I had to consciously keep my speed in check any time the trail pointed downhill. The riding position inspired so much confidence that I quickly outran the available traction from my close-knobbed tires in loose corners. With my weight shifted over the rear wheel and my hands out wide, I was able to leverage the bike around downhill corners with ease and maintain a comfortable, relaxed posture. When climbing, I could easily shift my hands forward to keep the front wheel down.
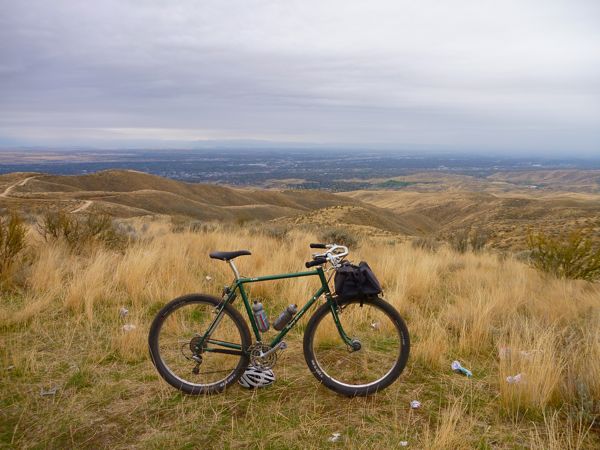
Overall, I’m quite happy with the comfort, control and multiple riding positions the Jones bars offer. On longer stretches of smoother terrain I find myself missing the aerodynamic position offered by the drop bars, but feel that the off-road confidence and control more than makes up for the slightly decreased efficiency on the pavement.
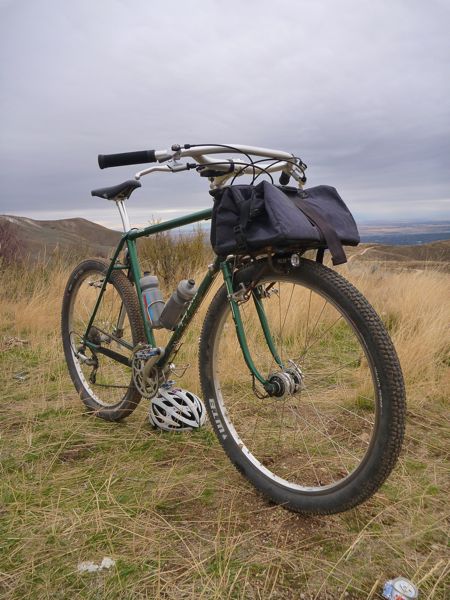
Overall, the Jones H-Bars are an excellent alternative to a drop bar for touring bikes that are regularly ridden in more technical and demanding situations. I’d recommend them to anyone who wants to blend the confidence and control of a flat bar with the comfort and hand positions of a drop bar. I’ll be taking a closer look at the setup process in a future post, so feel free to chime in with any questions you’d like to have answered or ideas you’d like to see explored. Thanks for reading!

42 replies on “Dropping Out and Looping In: Converting from Drop Bars to Jones Loop H-Bars”
Have you ever tried off road drops like the Soma Junebug or Salsa Woodchuck? I wonder how they compare.
Thanks for the comment, Paul! I have experimented briefly with dirt drops and like them for certain applications. However, I found that they offer fewer useful hand positions than traditional drop bars and certainly don’t provide the descending confidence of the Jones bars. They wouldn’t be my first choice for bikepacking but could be a good fit for other riders. Still, they would be an easier swap from traditional drops for a rider who doesn’t want to spend the money on the extra parts needed for the Jones bar conversion. Thanks for reading!
-Ryan
Last spring I also changed out the drop bars on my Surly LHT for the Jones Loop Bar. I use the bike primarily for commuting and regional touring (so far on pavement only). I have no regrets about the change-up. These bars greatly increased the overall comfort level as well as increased handling/control, especially on big descents. There is plenty of space on the bar to allow movement of the hands to various positions and sling or attach gear to it also. I can’t wait to put together an Idaho backroads touring set up and cap it off with the Jones Loop Bar!
Thanks for sharing your experience, Cory. I agree that the Jones bar is ideal for the rugged terrain up here in Idaho. Let us know if there is anything we can do to help with the build on your Idaho touring rig!
Cheers,
Ryan
Ryan-thank you for taking the time to share your experience with the H-Bars. I’ve been looking at all options for my Surly LHT-I never use the drops. One reason, I think, is that I wound up getting a bike that may be a bit too small and they are so far down as to be very uncomfortable. Cory- what shifter setup did you go with on your LHT after making the change? Thanks!
I switched to the Jones Loop Bar on my Salsa Vaya due to the wrist pain I was getting from drop bars. I have Rheumatoid Arthritis and I simply couldn’t ride drops any longer. I wish I had switched years ago. Better control on dirt roads, comfort all day and no more pain. What’s not to like?
When you switched over to the jones bar what did you do about your BB7 road brakes? From what I’ve read, I’ll need to switch to BB7 MTNs when I change brake levers.
Howdy, Will!
The difference between the RD and MTN BB7s is the cable pull from the levers. Same difference between cantilever and linear-pull rim brakes. Road/Canti levers pull less cable. MTN/Linear levers pull more. If you’re moving from a drop bar setup with BB7-Road brakes to a Jones bar, you can install “short pull” brake levers without changing your brakes.
Hope this helps; thanks for reading!
-Ryan
Will, there is a kit you can buy (like $16) to convert the cam surfaces of BB7 MTN to BB7 RD to allow for road lever use.
Exactly what I want to do with my 2015 Vaya. I rarely if ever use the full drops and do not like the feel of being “down there”. Doesn’t sound like a huge process. Did you change out the shift levers?
Keep the standard MTB lever with the BB7, They are so much more powerful and you can space out the pads slightly further to stop rubbing as much. I always use the BB7 like this now, they are greatly improved (Long pull lever, Short Pull BB7 [Road])
you own a gravel bike? too funny! 😉
All my bikes are gravel bikes, bro!
By the way….get a better platform for recording your tours. Track My Tour is sort of hard to follow, and more of your unique commentary would be appreciated! CGOAB or a wordpress blog perhaps?
Great article Ryan. I enjoyed the pictures too. I have a Surly LHT. I ride the passes of Colorado. Would those handle bars work well for that kind of riding?
Thanks, Skip
Thanks for reading, Skip! I’d say the Jones bars would be worth a try, especially if you’re riding unpaved roads over those high passes. I do sometimes miss the aerodynamic position attainable when descending down in the hooks on smoother terrain but if you don’t use the drops much you’d probably be quite happy on the H-Bars. I hope this helps.
Cheers,
Ryan
That’s a very cool set-up. I just finished my second Oregon Outback and, although I like the speed of my cross bike, I would certainly enjoy alternate hand positions other than my hoods (my tent fits in the drops). I also noticed that rack you have on the front of your bike. Do you mind telling me what kind of rack that is and how it mounts to your bike?
Thanks, Jimmy
Howdy, Jimmy! I hope you had a great time on the Outback. It is a pretty spectacular ride and one I’d love to do again. As for the rack, I designed and built it specifically for the Rando-Gnar. Some photos of the construction are on my Flickr page. It mounts to the front of the canti bosses and through the center hole in the fork crown, similar to the Nitto M-12. The Nitto M-18 has an almost identical platform to the M-12 but with a more adjustable design that would fit a wider range of bikes. One or the other of those would probably be the best off-the-shelf option, depending on your bike. If you’re thinking of going custom there is likely to be a framebuilder in your area who could make it happen, though that certainly won’t be the least expensive option… I hope this helps! Thanks for reading!
-Ryan
I also forgot to ask you why you did not mention the bar end shifters needed for the thumbs? Is this the best or only way to complete this conversion?
Thanks again, Jimmy
Jimmy,
I didn’t mention the bar-end shifters in the parts list because I already had them. If someone were converting a Long-Haul Trucker or similar touring bike with bar-end shifters already installed they wouldn’t have to purchase new shifters, just brake levers, thumbies, handlebar and (maybe) a stem. Most downtube shifters work on thumbies as well. If converting a bike with integrated shifter/brake levers, you would need new shifters in addition to the above. Bar-end shifters do fit in the ends of the Jones bars but I find the ergonomics of this setup awkward. It also puts the shifters in a position to be easily damaged in a crash, when riding in tight spaces or just laying the bike on its side. I hope this answers your question. Thanks again for reading.
-Ryan
How are the Jones holding up? Are you still happy with them? Also, curious as to what bag that was?
Philip,
Thanks for asking. I’ve put lots of miles on the Jones Bars since January and am still quite happy. I do miss the low and aerodynamic positions available with drop bars when descending pavement but those occasions have been rare. For most of the steep and rugged terrain I find myself on, the H-Bars are a perfect fit. The handlebar bag is homemade, custom for the RandoGnar’s front rack.
Tailwinds!
Ryan
Ryan,
Great post on the Loop H-Bar. I’m going to make the switch for many of the same reasons that you’ve outlined. The decision that I’m toying with is whether to go with the Loop or the Bend H-Bar. I recognize there are a few more hand placement options and extra room for do-dads on the Loop, but I’m also a fan of minimalism. Most of my rides are day trips, grocery runs, and a rare overnight. Do you have any thoughts between the two Jones Bars?
Thanks much!
Brian
Howdy, Brian!
Thanks for the question. I’d probably go with the Bend bar if you’re not planning on strapping a handlebar roll and are more focused on off-road day rides. For loaded riding and especially routes that include faster terrain like good dirt roads or ‘ahem’ pavement, I’d miss the forward extensions of the Loop bar.
Hope this helps!
Ryan
Nice write-up. You promised “the details and technicalities of the process – especially the fit aspect – in a future post”. Have you had a chance to do that? If so, maybe you can provide the link, as I can’t find it. If not, maybe I can encourage you to take the time to do it, as I’m sure I’m not the only person interested. I’m considering a switch to these bars on a touring bike that has drop bars and on which I have a problem with numb hands, so I’m anxious to read about how to fit these bars. Thanks!
I am looking forward to the detail post also Sue. What a timely post. I bought a Surly Disc Trucker over a year ago. I have maybe three miles on it. Yes, three miles. I absolutely hate the drops. I dislike the position of the bar end shifters. No one was able to tell me what levers I could use with the BB-7 brakes. Thank you. I believe I will use the exact setup you did.
Bob,
You need brake levers with a long pull- as for v-brakes vs. cantilever brakes- to use with the BB-7’s. Ryan’s post was annoyingly detailed in my opinion. But I wonder what other info you and Sue might be interested in. (Llano Estacado…..the most poetic idea)
Bike Hermit, Part numbers mostly. Thanks for correcting the brake levers for me. This article has inspired me to change out the parts and get on the Disc Trucker. (In all fairness, a motorcycle wreck that involved eleven broken bones contributed to the Surly sitting for so long)
I was interested in how Ryan fit his loop handlebars, i.e. how he chose the stem length and rise. The new article answers that exquisitely! Thanks, Ryan.
When I replaced my drop bars I took the easiest approach and used the same stem for the loop bars. After a few rides I decided I was a little cramped, and replaced it with one 10 mm longer. I’ve noticed a new tendency to lock out my elbows, so I’ll probably go back to the old stem.
Thanks again for both articles. I love detail!
Ryan
Great piece and thanks for being like a mental health councilor for all of us goofy people who have ridden in misery with drops and were afraid to admit we were not all that comfortable. I had my aha moment on a Surly ECR with H bars. What a revelation. Now I am about to upgrade my Surly Disc Trucker to H bars and get comfortable. At 67 with the accompanying aches and pains which can all be exacerbated by being too long in the saddle I think I’ll join the enlightened.
Thanks again.
I also converted the straight bars on my Surly LHT to a Jones H Bar and have found the switch really great for touring. They are sure more comfortable for my 70 year old body. The only drawback I found was trying to find a suitable place to mount my rear view mirrors. I live in Thailand and rearview mirrors are a must for survival.
I experimented with all kinds of mirrors and locations without any luck and finally stumbled on a solution to the problem. I mounted a straight aluminum bar end just in front of my grip and positioned it at about 20 degrees above horizontal. I then attached a Axiom Fastflash DLX adjustable mirror to the bar end. I first removed the rubber attachment band that comes with the mirror and substituted a high quality rubber “O” ring in its place for better stability. I still had considerable vibration to deal with so I then positioned a plastic mounting part from an old mirror into the bar end which supported the mirror from below and zip tied the mirror to it. Perfect! No vibration and I have a great unobstructed field of view behind me. I chose this particular mirror because it has a nice convex lens and several articulation joints. I took a series of pictures to illustrate what I did but am not sure just how to go about posting them here. However, if that can’t be done then the pics can be seen on crazyguyonabike under reviews. They are also posted here:
http://www.therandomsam.com/2015/07/jones-loop-h-bar-710-1000-mile-review/
I am thinking of building up a gravel bike using a lynskey (Kona Rove TI) or Lightspeed T5 ti frame. These are spec’d with drops, but, I want the comfort of the H-bars. do you see any particular geometry problems with changing to the H-bars
Monty,
Watch the videos on Jones Bikes site. Jeff Jones suggests a shorter stem might be required because of the forward sweep of the Jones Loop Bars but other than that I don’t think handling should be affected.
Any insight on adapting hydro brakes and sram rival 1×11 to jones h bars? I don’t need to keep the double tap levers, but what would be suitable replacements (levers/shifter)? New stem as well?
Bike: Kona sutra LTD (http://2016.konaworld.com/sutra_ltd.cfm)
Martin,
Any SRAM trigger shifter with a clamp size of 22.2mm will work. Looks like currently, for 11 speed, that means XX1 or XO1. Likewise with brake levers. You might be better off to get levers and calipers all connected and pre-bled. In that case, any SRAM or Avid brakes will work.
Great article and we are struggling with the exact same situation on a new Salsa Fargo. My wife just cannot get comfortable on the Woodchipper bars, many adjustments and “playing around”. The Fargo has those Shimano double tap shifters..how do we change all that.
Thanks for the info.
Nick
Nick,
It’s not too difficult to make the swap, but you will need to purchase new brake levers (MTB style) and shift levers that will work with your derailleurs. You will probably need all new (longer) cables and housing as well.
Last summer I broke my neck in a cycling accident, and had my C1-3 fused. I thought I’d be able to get back on my road ‘adventure’ bike but I’m having difficulty holding my head up. Cycling has been my passion for over 40 years (including 4 solo RAAMs, USCF racing, commuting, international touring, and partner of Burley Design Cooperative many years ago); and I’d prefer to figure out a solution other than using a recumbent (which I know will work but not my first choice for backcountry international touring). These bars might help keep me in a more upright position (and I didn’t use my drops much after turning 60). I have a 10 year old S&S Co-Motion steel touring machine that I would try converting with these bars. If I can get the bars level (or even a little higher) than my saddle it might work with my fusion. I’m going to Interbike this year (have covered it for several cycling publications over the past decade), and might even look at Shimano electronic or Sram eTap to use with these bars. I don’t think a recumbent would be the best choice for some of the travels I’d like to do … but it is a last-resort option. I realize that the Co-Motion handling might be effected a bit but I’m willing to make the trade-off. This is the first cycling thread that seems to address some of my medical issues. Any thoughts?
Hey Ryan, I’m hoping you can point me in the direction of the front rack you have on your Flying arrow bike, it looks custom, any leads to get myself something similar would be much appreciated!
Thanks
Howdy, Scott! Thanks for asking about the rack. It is custom; I built it along with the frame and fork. Depending on where you’re located I’d bet there is a framebuilder or rack maker nearby who could build you something similar. Maybe someday in the future I’ll have the time to build racks for customers but we’re a long way from there! Thanks for reading!
Cheers,
Ryan
Hey I know this is an old post but maybe you can give me an idea about how extended climbs on dirt/gravel roads tend be with the jones bar? Do you find climbing with the jobes bar to be comfortable and at least no more difficult than with drops? I have a similar style bike to you as it’s a road-ish bike with 42-50mm tires and it sees a lot of dirt/gravel climbing in southern NH and VT. I have found like you that descents on rough roads can be scary and take a toll on my hands with drop bars. My main worry with a jones bar randognar type setup is how the more upright position will feel on long climbs and after 8-10+ hour days of riding. Thanks. This is a great post I really dig you setup.
Howdy, Kenny! Thanks for the question. I really like climbing with drop bars as the wide, forward grip position on the brake hoods provides plenty of leverage and a powerful pedaling position either in or out of the saddle. Moving forward on the Jones bars – gripping near the welds – provides a similar position but without the secure hold on the hoods. I find climbing in the saddle to be just as efficient on the Jones bars but sometimes miss the brake hoods for out-of-the-saddle climbing.
To your concern about the more upright position, you don’t necessarily end up more upright with the Jones. It is all about how you set them up. Everyone has a different preference for how they want to be positioned on the bike, so I’d imagine you could find a comfortable all-day setup with the Jones. I still prefer drop bars for long days on tamer terrain but really appreciate the Jones when things get rougher.
I hope this helps! Thanks for reading!