Categories
Crossroads

A Beginners Guide To Bike Touring

The Bike Hermit didn’t write this but he thinks it’s funny. Actually, this was posted on the Touring pages of bikeforums dot net

Easy to get lost for hours on those pages. Don’t forget to come back!

A Beginners Guide to Cycle Touring: How to prepare

Step 1: Get a spagetti-strainer and several small sponges. Soak the sponges in salt-water and paste them to the inside of the spagetti-strainer. Place the
strainer on your head. Find a busy road. Stand by the side of the road and do
deep knee-bends for 8 hours. This will acclimatize you to a day’s ride.

Step 2: Take some 200-grit sandpaper and rub your rear-end and the insides of your legs for about 20 minutes. Rinse with salt-water. Repeat. Then, sit on a softball for 8 hours. Do this daily for at least 8 days.

Step 3: Each day, take two twenty-dollar bills and tear them into small pieces. Place the pieces on a dinner-plate, douse them with lighter fluid and burn them. Inhale the smoke (simulating car-fumes). Rub the ashes on your face. Then go to the local motel and ask them for a room.

Step 4: Take a 1-quart plastic bottle. Fill it from the utility sink of a local
gas-station (where the mechanics wash their hands). Let the bottle sit in the
sun for 2 or 3 hours until it’s good and tepid. Seal the bottle up (kinda,
sorta) and drag it through a ditch or swamp. Walk to a busy road. Place your
spagetti-strainer on your head and drink the swill-water from the bottle while
doing deep knee-bends along the side of the road.

Step 5: Get some of those Dutch wooden-shoes. Coat the bottoms with 90-W
gear-oil. Go to the local supermarket (preferably one with tile floors). Put
the oil-coated, wooden shoes on your feet and go shopping.

Step 6: Think of a song from the 1980’s that you really hated. Buy the CD and play 20 seconds of that song over and over and over for about 6 hours. Do more deep knee-bends

Step 7:
Hill training: Do your deep knee-bends for about 4 hours with the
salt-soaked spagetti-strainer on your head, while you drink the warm
swill-water and listen to the 80’s song over and over (I would recommend “I’m a cowboy/On a STEEL horse I ride!” by Bon Jovi). At the end of 4 hours, climb onto the hood of a friend’s car and have him drive like a lunatic down the twistiest road in the area while you hang on for dear life.

Step 8:
Humiliation training: Wash your car and wipe it down with a
chamois-cloth. Make sure you get a healthy amount of residual soap and
road-grit embedded in the chamois. Put the chamois on your body like a
loin-cloth, then wrap your thighs and middle-section with cellophane. Make sure it’s really snug. Paint yourself from the waist down with black latex paint.  Cut an onion in half and rub it into your arm-pits. Put on a brightly colored shirt and your Dutch oil-coated wooden shoes and go shopping at a crowded local mall.

Step 9:
Foul weather training: Take everything that’s important to you, pack it in a Nylon corodura bag and place it in the shower. Get in the shower with it. Run the water from hot to cold. Get out and without drying off, go to the local convienience store. Leave the wet, important stuff on the sidewalk. Go inside and buy $10 worth of Gatorade and Fig Newtons.

Step 10:
As Archimedes hypothesized: “Use a simple lever to move the Earth from one place to another”. After doing that, go around your house and lift heavy things that you never imagined a person could lift. Surprise yourself. Do 1,000 sit-ups. Then 10,000. Eat lunch. Repeat. Argue with every girlfriend/boyfriend you’ve ever known and be RIGHT. Solve all the problems of politics, faith and economics. At the end of the day, get into a huge tub filled with hot soapy water and relax, because tomorrow is another BIG DAY ON THE BIKE!

Step 11: Headwinds training: Buy a huge map of the entire country. Spread it in front  of you. Have a friend hold a hair-dryer in your face. Stick your feet in
taffy and try to pull your knees to your chest while your friend tries to
shove you into a ditch or into traffic with his free hand. Every 20 minutes
or so, look at the huge map and marvel at the fact that you have gone nowhere  after so much hard work and suffering. Fold the map in front of a window-fan set to “High”.

Useful tips for anyone planning a bicycle tour, trip, journey, expedition, whatever
you label it. Hope you have enjoyed this page.

Categories
Fenders

More On Honjo Fenders

I have been researching other resources for Honjo fenders in preparation for adding them to the store and to supplement my post on touring bicycle fenders.

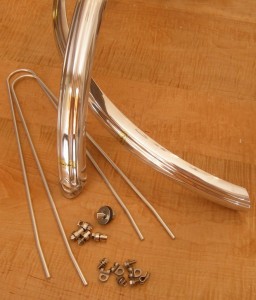
photo of honjo alloy fenders
Honjo Koken alloy fenders

I came across this article on Raymond Parker’s VeloWeb. The web address is http://veloweb.ca (he’s Canadian eh.) Very detailed and well photographed instructions there. While he is installing Honjo fenders, the guide will work as well for other metal fenders such as Gilles Berthoud and Tanaka.

Also, lo and behold, there is a Honjo Fenders group on flickr.com. Lots of good photos and ideas for  mounting fenders there.

Categories
Bike Touring Tips Hermit's Workshop Saddlebags

@#!% Flat Tire

There are dozens of videos out there about changing a flat tire. None with background music by Sonny Stitt.  Here’s one!

A couple of things. Notice that I just lay the bike on it’s side with the derailleur up. That’s an easy way to do it when you’re on the side of the road. Also, I shift the chain into the smallest cog. When I put the tire back on it’s easy to remember what cog to put the chain over so that the wheel will be centered.

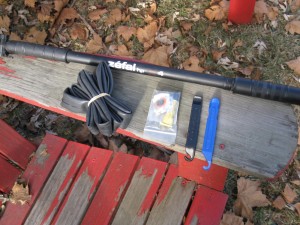
This is what I carry on the bike to change a flat:

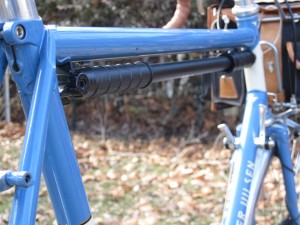
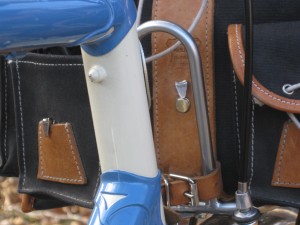
Pump. I use a Zefal HPX frame fit pump. This pump is all aluminum and the barrel is long enough to push a decent amount of air, so the tire is up to pressure relatively quickly. Plus, unlike CO2 pumps,  it has never failed or frozen. It mounts to the underside of the top tube

on  bikes that have a pump peg.

Or it can be mounted in front of the seat tube, but this precludes the use of a water bottle there.

Spare tube, tire levers and patch kit. The simplest and quickest way to fix a flat is to change the tube. But I only want to carry one spare and if I get another flat I need to be able to patch one of the flat tubes.

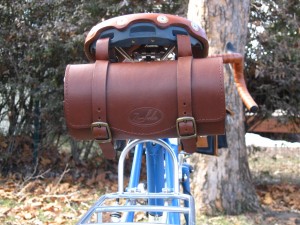
Seat bag. For shorter day rides I use a Zimbale leather saddle bag to carry these items plus a multi tool.

Categories
Touring Bicycles

Steel Bikes And Comfort

Even though I’m a fan of steel bikes, it’s mostly because of the durability of the material. I certainly like the ride quality too, but I think the idea that steel is a more plush or forgiving ride because it flexes or dampens is hogwash. The idea has almost become gospel now just because it’s been repeated so many times.  Don’t get me wrong, I know my steel bike frames flex…. I can hear my fender and/or brake and/or front derailleur rub from time to time if they are a little out of whack and I am pressing hard on the pedals. But that is torsional flex.

It’s the idea of vertical flex of a bicycle frame I have a hard time envisioning.

Scientific diagram

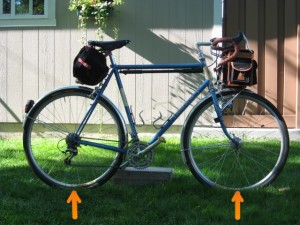
Imagine the arrows to be balancing the downward force of the rider and the bike.

Categories
Touring Bicycles

The Touring Bicycle – Update

I’ve decided to insert a post to update my previous posts about touring bicycles. From the previous posts in might appear that the choices for bikes with which one can travel is limited to pretty traditional designs. This is far from the case as evidenced by this journal at crazyguyonabike. A mountain bike with an Xtracycle attachment obviously is a viable way to carry gear for self supported touring.

So, even though I have my opinions and preferences, it is not to say that there are no other good options for touring bikes.

Now back to our regularly scheduled program!

Categories
Touring Bicycles

The Touring Bicycle – Part 2

In part 1 of this series I hinted at some of the differences between a touring bicycle and a bicycle for racing or performance. Now I will get more specific about what to look for in a touring bicycle.
Let’s use our bicycle frame picture for a reference again.

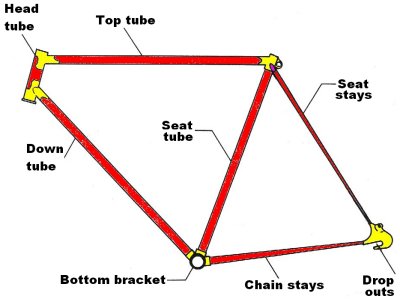
A touring bicycle will have relatively long chain stays…… for a couple of reasons. First, if the bicycle will be loaded with panniers or saddlebags on either side of a rear rack ,longer chain stays will allow the bags to be placed farther aft, reducing the chance that the riders feet will hit the bags when pedaling.

Longer chain stays will move the rear wheel farther back too. This will allow for more clearance between the tire and the frame. (Good for fat tires and fenders!)

Don’t worry too much about a number for the chainstay length. Just look at the bike with wheels and tires mounted and visually determine if there is room between the tires and the frame for fenders. If you just have a frame with no wheels/tires then measure the chainstay length from the center of the bottom bracket to center of the rear dropout. 17 3/4 to 18 inches ( 45 to 46 centimeters) is what you are looking for.No BuenoMui bien

Look at the fork too. Make sure there is enough clearance for fenders.

A touring bicycle will be ridden steadily for hours at a time. There will be no sprinting or  hard echelons. On a comfortable touring bike the top of the handlebars will be within a couple of centimeters, or level with, the top of the saddle. Forget all the mumbo jumbo the bike fitters, who will charge upwards of $200.00 to adjust your saddle and handlebars, spout about performance  and “your game”. Your game is all day comfort.  To achieve this, many of the best touring bike makers will slope the top tube up a few degrees from the junction with the seat tube. Then they will extend the top of the head tube a few centimeters. Voila, the handlebars are up where they belong for comfort, without resorting to some crazy looking extensions.

Of course, in order to carry things on the bike, you will need some sort of rack system. A good touring bike will have tabs brazed onto the frame near the rear dropouts and on the fork dropouts. These tabs have threaded holes for rack and fender attachment. Look for two “braze ons” on the rear dropout (for fenders as well as racks) and one or two on the fork. Look for bolt holes in the mid section of the front fork as well. These are useful for attaching front or “low rider” racks.

Most bike frames have bolts in the down and seat tubes for water bottle cages. Some will have a place for another cage on the bottom of the down tube near the bottom bracket. On a self supported tour, the more ways to carry water the better.

These are just some of the things to consider in a touring bicycle. In future articles we will get into the details about goodies like racks, fenders, tires, etc.

Categories
Touring Bicycles

The Touring Bicycle

This is a topic that will always create controversy. There are as many ideas about what a touring bicycle should be as there are touring bicyclists. Especially when it comes to frame materials. There are many , many articles and opinions about frame materials, and that’s a tar baby with which I’m not willing to wrestle.

Some features, however, undeniably contribute to a bicycle which is suitable for carrying a load and for spending long days in the saddle. For clarity and as a reference, here is a drawing of a bicycle frame with the various parts named.


You will have to imagine the fork, which inserts into the head tube to hold the front wheel.

Where to begin?  Hmmmmm. How about size? OK.
Walk into any bike shop to get sized for a bike and you will hear about stand over height. Stand over height is simply a measurement from the floor to the top of the top tube at a point roughly midway between the seat tube and the head tube of a bicycle with wheels and tires mounted. Obviously, being able to “stand over” the bike is a benefit. That is where the usefulness of this rule of thumb ends. The bike shop sales person will undoubtedly tell you that on a “road bike” you want 2 inches (or something) between your crotch and the top tube.  What if the top tube slopes a little, or a lot? How long is the top tube in relation to the seat tube and resultant stand over height?  It’s more complicated than stand over height.

Most frames will have a designated size. This is usually a measurement from the center of the bottom bracket to the top of the top tube measured parallel to the seat tube. Again, this is sort of a meaningless measurement unless the other  tube dimensions are known.

What’s a person to do? Find a bike shop or bike company which specializes in touring bikes. Talk to them and get a feeling for how much traveling they have done by bicycle. See what kind of bikes they stock or sell. Most bike shops do not stock or know touring bicycles and this can be a frustrating search, but don’t give up. Be wary of buying a bike that is too small. In general, a race bike will be smaller than a touring bike for a given person. Be careful not to get  trapped into the truisms about smaller frames being lighter or more responsive or stiffer. What you are worried about is being comfortable! A too small frame can make it difficult to carry panniers without  interfering with the rider’s feet, and may make the loaded bike less stable.

What about weight?
If you watch people in bike shops, you will see most of them pick up the bicycles to see how much they weigh. It’s actually quite entertaining. As a touring cyclist you should be more worried about durability… of the frame, of the components, and of the wheels especially. Not to say  heavier is automatically more durable, but light weight bikes and wheels have no place on a  self supported tour.

In Touring Bicycle (Part 2) I will go into more detail about specific features which should be considered when shopping for a good bicycle for self supported touring .


Categories
Living Vicariously

Bike Touring News

This is it! After a couple of false starts and lots of wailing and gnashing of teeth, the Bike Touring News site is finally officially off the ground! Just like any tour we have no idea exactly where this will lead or how it will end up but the direction is clear:

Providing inspiration, ideas, practical and technical tips, equipment reviews, reader contributions and comments,  and whatever else we can think of to make this site a single source to help people sort out the ever increasing and ever more confusing ways to travel by bicycle.

Bike touring means different things to different people. In the context of this site, there will be a loose interpretation. A “micro-tour” (a term coined by Pondero) might be taking an hour and a half to ride to a secluded spot 4 miles from home, brew some tea, and ride home. A trip out to the local state park with a picnic lunch loaded in the front basket qualifies as a tour.  The S24O or sub-24-hour ride is an overnight bike camping routine popularized recently by Rivendell Bicycle Works founder Grant Petersen. The supported, organized tours and charity rides can be a lot of fun. Then, of course, there is the multiple day trip on a fully loaded bike…probably the image that comes to mind most often.

So there is a lot of ground to cover. We’ve planned our route, we’ve done our training, and we have our gear stowed. Now we’re grabbing the handlebars, hitting the road and looking forward to whatever happens!