Categories
Drivetrain Touring Bike Components

Bicycle Touring Tires

This is literally where the rubber meets the road. It’s sort of a boring topic but tire problems could end a bicycle tour quicker than almost anything I can think of. And a flat tire is probably the most likely mechanical repair a traveling bicycler will need to master. Luckily, there are many very good options when it comes to bicycle touring tires.
There is a wealth of information stamped on the side of a bicycle tire.  Here you will see the size of the tire. For example 700 X 32 for a 700c diameter tire or 26 X 1.75 for a 26 inch diameter tire.   The second number, after the “X”,  is an indication of the width of the inflated tire. Depending on your bike, you may either have 26 inch wheels or 700c wheels ( there are other sizes of wheels, such as 650b or 27 inch, but those are not as common)
You will want to carry one or two extra tires with you depending on how far it is between bike shops on your route. So make sure you know what size your bike takes. Most tires come in a “folding” version, which means the bead, or the part of the tire that hooks on the rim, is made of flexible material and the tire can be folded or rolled into a small package.

The width of your tires will affect rolling resistance, comfort and durability.
It may be counter-intuitive but for a given inflation pressure a wider tire will have lower rolling resistance than a narrower tire. And lower inflation pressure, to a point, means a silkier ride because of the greater air volume acting as a cushion.
A wider tire with more air volume will also help protect against pinch flats- the pinching of the inner tube between the tire and the wheel rim when hitting a sharp bump.

Tires with a smooth tread, even no tread, will work best for rides which will be mostly on paved surfaces. Bike tires behave differently than automobile tires and grooves in the tread of a bike tire do nothing to increase grip. In fact, the more rubber actually touching the road, the better. The tire maker Schwalbe explains this better than I can. If you’re riding off-road or on un-paved roads a knobby tread pattern is more important.

zion bike trip
note the 650B makes a great touring tire

Look for tires made specifically for touring or urban riding. These tires will have layers of  puncture resistant materials such as Kevlar or Aramid under the tread. Usually the casing of these tires will be strong enough to handle the extra weight and loads of a touring bicycle. Sometimes the rubber tread itself will be significantly thicker than the tread on a racing or training tire.

I have used the Panaracer brand T-Serv tire for my tours the last two years and I have been very happy with the performance. These are not super burly tires but I am not heavy and I travel relatively light. The tread wears very well on these tires and the Aramid belt works well to prevent punctures. The cord used in the casing is strong, but the tire is still supple and feels smooth to ride.

Schwalbe Marathon is a line of tires which includes tires made for bike touring.  Everything from tires for light touring to tires made for the extreme expedition adventure.

Don’t scrimp when it comes to buying tires. You will have enough things to worry about and enough challenges to keep you busy on your tour.

Categories
Touring Bicycles

The Touring Bicycle – Part 2

In part 1 of this series I hinted at some of the differences between a touring bicycle and a bicycle for racing or performance. Now I will get more specific about what to look for in a touring bicycle.
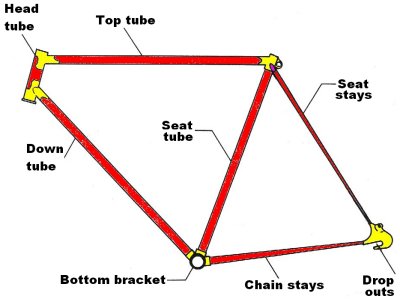
Let’s use our bicycle frame picture for a reference again.

A touring bicycle will have relatively long chain stays…… for a couple of reasons. First, if the bicycle will be loaded with panniers or saddlebags on either side of a rear rack ,longer chain stays will allow the bags to be placed farther aft, reducing the chance that the riders feet will hit the bags when pedaling.

Longer chain stays will move the rear wheel farther back too. This will allow for more clearance between the tire and the frame. (Good for fat tires and fenders!)

Don’t worry too much about a number for the chainstay length. Just look at the bike with wheels and tires mounted and visually determine if there is room between the tires and the frame for fenders. If you just have a frame with no wheels/tires then measure the chainstay length from the center of the bottom bracket to center of the rear dropout. 17 3/4 to 18 inches ( 45 to 46 centimeters) is what you are looking for.No BuenoMui bien

Look at the fork too. Make sure there is enough clearance for fenders.

A touring bicycle will be ridden steadily for hours at a time. There will be no sprinting or  hard echelons. On a comfortable touring bike the top of the handlebars will be within a couple of centimeters, or level with, the top of the saddle. Forget all the mumbo jumbo the bike fitters, who will charge upwards of $200.00 to adjust your saddle and handlebars, spout about performance  and “your game”. Your game is all day comfort.  To achieve this, many of the best touring bike makers will slope the top tube up a few degrees from the junction with the seat tube. Then they will extend the top of the head tube a few centimeters. Voila, the handlebars are up where they belong for comfort, without resorting to some crazy looking extensions.

Of course, in order to carry things on the bike, you will need some sort of rack system. A good touring bike will have tabs brazed onto the frame near the rear dropouts and on the fork dropouts. These tabs have threaded holes for rack and fender attachment. Look for two “braze ons” on the rear dropout (for fenders as well as racks) and one or two on the fork. Look for bolt holes in the mid section of the front fork as well. These are useful for attaching front or “low rider” racks.

Most bike frames have bolts in the down and seat tubes for water bottle cages. Some will have a place for another cage on the bottom of the down tube near the bottom bracket. On a self supported tour, the more ways to carry water the better.

These are just some of the things to consider in a touring bicycle. In future articles we will get into the details about goodies like racks, fenders, tires, etc.

Categories
Touring Bicycles

The Touring Bicycle

This is a topic that will always create controversy. There are as many ideas about what a touring bicycle should be as there are touring bicyclists. Especially when it comes to frame materials. There are many , many articles and opinions about frame materials, and that’s a tar baby with which I’m not willing to wrestle.

Some features, however, undeniably contribute to a bicycle which is suitable for carrying a load and for spending long days in the saddle. For clarity and as a reference, here is a drawing of a bicycle frame with the various parts named.


You will have to imagine the fork, which inserts into the head tube to hold the front wheel.

Where to begin?  Hmmmmm. How about size? OK.
Walk into any bike shop to get sized for a bike and you will hear about stand over height. Stand over height is simply a measurement from the floor to the top of the top tube at a point roughly midway between the seat tube and the head tube of a bicycle with wheels and tires mounted. Obviously, being able to “stand over” the bike is a benefit. That is where the usefulness of this rule of thumb ends. The bike shop sales person will undoubtedly tell you that on a “road bike” you want 2 inches (or something) between your crotch and the top tube.  What if the top tube slopes a little, or a lot? How long is the top tube in relation to the seat tube and resultant stand over height?  It’s more complicated than stand over height.

Most frames will have a designated size. This is usually a measurement from the center of the bottom bracket to the top of the top tube measured parallel to the seat tube. Again, this is sort of a meaningless measurement unless the other  tube dimensions are known.

What’s a person to do? Find a bike shop or bike company which specializes in touring bikes. Talk to them and get a feeling for how much traveling they have done by bicycle. See what kind of bikes they stock or sell. Most bike shops do not stock or know touring bicycles and this can be a frustrating search, but don’t give up. Be wary of buying a bike that is too small. In general, a race bike will be smaller than a touring bike for a given person. Be careful not to get  trapped into the truisms about smaller frames being lighter or more responsive or stiffer. What you are worried about is being comfortable! A too small frame can make it difficult to carry panniers without  interfering with the rider’s feet, and may make the loaded bike less stable.

What about weight?
If you watch people in bike shops, you will see most of them pick up the bicycles to see how much they weigh. It’s actually quite entertaining. As a touring cyclist you should be more worried about durability… of the frame, of the components, and of the wheels especially. Not to say  heavier is automatically more durable, but light weight bikes and wheels have no place on a  self supported tour.

In Touring Bicycle (Part 2) I will go into more detail about specific features which should be considered when shopping for a good bicycle for self supported touring .


Categories
Planning Resources

Planning A Bike Touring Route

Deciding where to go on your bicycle touring adventure and planning the route is an enjoyable part of the experience. Maybe there’s a part of the country or world you have always wanted to visit, and doing it on a bike can be a profound pleasure.

But…how does one know what the roads are like?…Is the area safe?…..What about auto traffic?….

There are some good sources  for route planning.

The Adventure Cycling Association publishes excellent maps outlining almost 41,000 miles of bicycle routes which have been researched and refined over the last 4 decades. These have descriptions of what to watch out for and how to plan. They also offer supported trips, a Cyclist’s Yellow Pages, and a print publication that always has great useful articles.

Google Maps is another good resource. Just click on any area in the world and you can look at the topography, with elevations included, or a satellite view, or the straight up map view. This application also allows you to view a photograph at almost any point along most roads, by simply dragging an icon, placing it on the highlighted road and dropping it. Very, very cool. In Google Earth one can “fly” over the route.

Another idea is to use routes identified by companies which specialize in guiding supported tours. These routes are usually  researched thoroughly  and a person can find information on camping and other places to stay, where to eat, topography, traffic, etc.

Crazyguyonabike.com is another fantastic resource. This is a free, independent website for hosting bicycle touring journals, forums and resources. The content is contributed by people from all over the world. There are currently (2010) almost 5000 journals and over ½ million photos contributed by people doing their own bicycle tours. Many of these are updated daily by people during the tour, so you can follow them every day!

When planning the route, take into consideration how much time you have, your fitness level, the fitness level of your traveling partner(s) if any, and expected conditions such as weather and elevation changes. Consider where you want to end up each night. With these things in mind plot out your daily mileage, remembering that, if you are self supported, you will be  carrying additional weight. So, even if you are in great shape and regularly do 80 to 90 or more mile training rides, those are not realistic numbers for touring. Some days 40 miles might feel like an epic ride. Other days 100 miles will be doable. Allowing plenty of time to complete your route,…more than you think you need…will give you time to stop at points of interest, or even just (gasp) relax! Remember, this is supposed to be fun.

Categories
Living Vicariously

Bike Touring News

This is it! After a couple of false starts and lots of wailing and gnashing of teeth, the Bike Touring News site is finally officially off the ground! Just like any tour we have no idea exactly where this will lead or how it will end up but the direction is clear:

Providing inspiration, ideas, practical and technical tips, equipment reviews, reader contributions and comments,  and whatever else we can think of to make this site a single source to help people sort out the ever increasing and ever more confusing ways to travel by bicycle.

Bike touring means different things to different people. In the context of this site, there will be a loose interpretation. A “micro-tour” (a term coined by Pondero) might be taking an hour and a half to ride to a secluded spot 4 miles from home, brew some tea, and ride home. A trip out to the local state park with a picnic lunch loaded in the front basket qualifies as a tour.  The S24O or sub-24-hour ride is an overnight bike camping routine popularized recently by Rivendell Bicycle Works founder Grant Petersen. The supported, organized tours and charity rides can be a lot of fun. Then, of course, there is the multiple day trip on a fully loaded bike…probably the image that comes to mind most often.

So there is a lot of ground to cover. We’ve planned our route, we’ve done our training, and we have our gear stowed. Now we’re grabbing the handlebars, hitting the road and looking forward to whatever happens!